Achieving and maintaining network low latency is necessary for fast-paced games like Counter Strike Global Offensive. These are the setting that I found to be working with my computer and it did achieve low latency in my case.
Computer hardware Requirement
- It is always helpful to have a powerful CPU ( 6 cores or more) and discrete GPU (4 GB VRAM or more) in achieving low latency.
- RAM: 8GB or more
CS GO Game Settings For low Latency
The CSGO video settings can be tuned such that the CPU and GPU usage remains under 70%. This will make sure that the CPU and GPU can easily render the frame and achieve low network latency.
Nvidia performance Overlay can be used to check the CPU and GPU utilization during CSGO gameplay. To do so do the following:
- Open the Nvidia Geforce Experience window.
- Click on the Settings icon.
- Select General tab
- Enable In-Game Overlay.
- Select In-game Overlay > Settings.
- Select HUD layout > Performance > Basic.
- Play CSGO game.
- Check the CPU utilization and GPU utilization for the current CSGO setting.
To disable the Performance overlay do the following:
- Select In-game Overlay > Settings.
- Select HUD layout > Performance > Off.
CSGO Video Settings
- Brightness: Set the high brightness level so that the darker area in the game is easily visible.
- Display Mode: Fullscreen
- Color Mode: Set the color mode depending on the type of Display unit that is being used.
- Aspect Ratio: Keep it the same as the aspect ratio of the Display device.
- Resolution: Keep it the same as the native resolution of the Display device.
- Laptop Power Saving Mode: Disabled
Video Advanced Setting for medium GPU usage
- Global Shadow Quality – Low
- Model / Texture Detail – Low
- Effect Detail – Low
- Shader Detail – Medium
- Boost Player contrast: Disabled
- Multicore Rendering – Enabled
- Multisampling Anti-Aliasing Mode – None
- FXAA Anti-Aliasing: Disabled
- Texture Filtering Mode – Bilinear
- Wait for Vertical Sync: Disabled
- Motion Blur – Disabled
CS:GO Mouse Settings
If you have a gaming mouse then do the following settings:- Set the Gaming Mouse DPI between 1000 DPI and 1600 DPI.
- Adjust the CSGO Mouse sensitivity which is most accurate while aiming in CSGO and feels comfortable.
- Raw Input: ON
- Mouse Acceleration: Off
- In Windows OS, open the Control Panel > Mouse.
- Uncheck "Enhance pointer precision".
- Set the slider labeled "Select a pointer speed" which makes you comfortable while using the mouse pointer in Windows OS.
Nvidia Control Panel Settings for low latency
Display Settings
- Open NVIDIA Control Panel.
- Select Display> Adjust desktop size and position.
- Select Scaling > No Scaling.
- Select GPU for the drop-down menu named Perform Scaling On.
- Check the checkbox named "Override the Scaling mode set by games and programs"
NVIDIA Control Panel 3D Settings
- Open NVIDIA Control Panel.
- Select 3D Settings > Manage 3D Settings.
- Select the Program Setting tab.
- Select Counter-strike: Global offensive from the drop-down menu named Select a program to customize.
- Ambient Occlusion : Off
- Anisotropic filtering: Application Controlled
- Antialiasing - Gamma correction: On
- Antialiasing Mode: Application Controlled
- Antialiasing Transparency: Off
- Background Application Max Frame Rate: Off
- CUDA GPUs: All
- Low Latency Mode: Ultra
- Max Frame Rate: Off
- Multi-Frame Sampled AA(MFAA): Off
- Power Management Mode: Adaptive
- Texture filtering Anisotropic sample optimization: On
- Texture filtering Negative LOD bias: Allow
- Texture filtering Quality: High Performance
- Texture filtering Trilinear optimization: On
- Threaded optimization: On
- Triple Buffering: Off
- Vertical Sync: Use the 3D application setting
- Click on Apply Button to apply the settings.
Nvidia GeForce Experience Settings
Disable InGame Overlay
If Nvidia In Game overlay is not used then it's advised to disable it.
- Open the Nvidia Geforce Experience window.
- Click on the Settings icon.
- Select General tab
- Disable In-Game Overlay.
Disable Image Scaling
Using Image scaling will add to network latency. So it's advised to disable it.
- Disable IMAGE Scaling.
Steam In-Game Overlay Settings
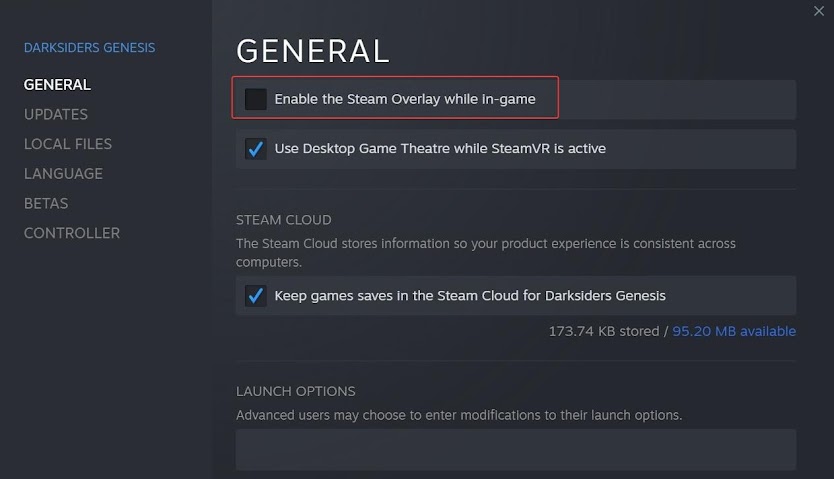
If you do not use the features provided by Steam in-game overlay then it is advised to disable it.
- Open Steam windows.
- Select Library Tab.
- Right-click on the game app and select Properties.
- Select the General tab.
- Untick the option "Enable the steam Overlay while in-game"

CSGO General Settings
CSGO Launch options settings can be used to customize the game. Various commands can be used to
To do so do the following:
- Open Steam App.
- Select the CSGO game and right-click on it. Select Properties.
- Select the GENERAL Tab.
1. Setting the FPS limit
Setting a limit on FPS makes sure that the CPU and GPU are easily able to render the frame thus leading to lower latency.
Command syntax: +fps_max <fps>.
Use your value to set this limitation on FPS.
Example: To set the CSGO fps limit to 180 use the command "+fps_max 180"
2. Run CSGO app in high priority
Command: -high
CS:GO gets the highest priority from the computer CPU


