Guide for various Internal Filters and External Filters tab setting available in Media Player Classic Home Cinema (MPC-HC) options window.
- Internal filters
- Audio Switcher
- Audio Renderer
- External Filters
System Config:
- Software : MPC HC 1.9.9 x64
- Operating System : Windows 10 Pro x64
Internal Filters Tab
Source Filter
Source filter is used to split the audio and video stream of a media file.
Source Filter group box lists all the media formats supported by the Internal Splitter.
User can manually check a file format which
Transform Filter
Transform Filter is used to decode the audio or video stream.
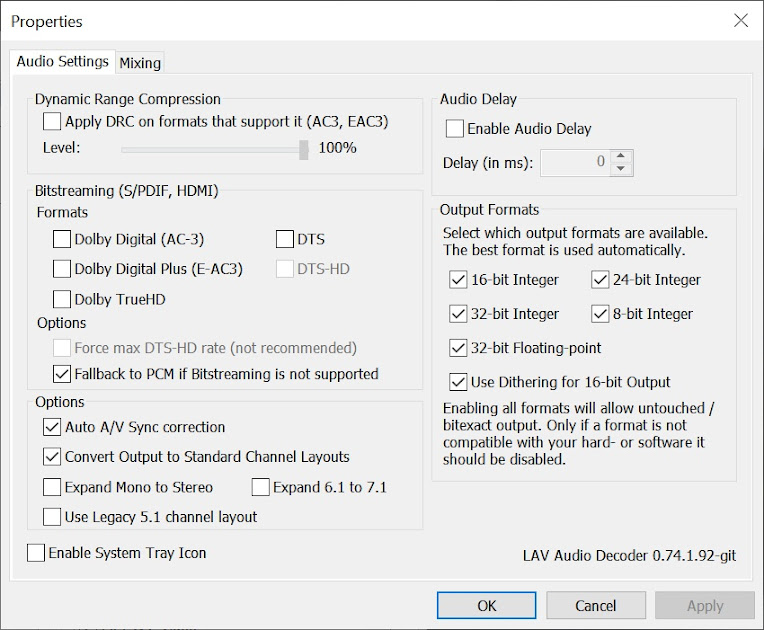
Internal LAV Filters settings
MPC-HC uses LAV filters as internal filter.
Splitter : Splitter button is used to open internal LAV Splitters.
Audio Decoder : Audio Decoder button is used to open internal LAV Audio Decoder.
Video Decoder : Splitter button is sued to open internal LAV Video Decoder.
Audio Switcher
MPC-HC app inbuilt Audio switcher can be used to select the audio track which will be used as output audio.
Enable built-in audio switcher filter :
- Checked : MPC-HC inbuilt audio switcher Filter will be used.
- Unchecked : MPC-HC inbuilt audio switcher Filter will not be used.
Normalise :
- Checked : Audio output will be normalized automatically. The part of the audio which is in low volume will be increased.
- Unchecked : Audio output will not be normalized automatically.
Max Amplification : Here user can set the maximum amount of audio amplification done by Normalize feature.
Regain Volume :
- Checked : The speech volume will be specifically amplified by normalize feature.
- Unchecked : The speech volume will not be amplified.
Boost
Boost slider can be used to give constant gain to output audio. It is useful in increasing the volume level when the volume level of the media file is low.
Down sample to 44100 Hz : When this option is enabled, the audio sample rate is converted to 44100 Hz.
Audio time Shift
The MPC-HC inbuilt Audio time shift settings is useful when audio track is out of sync with the video.
Playback of audio track can be time shifted forward or delayed. It is u
Time shift is done in unit millisecond (ms).
1 second = 1000 millisecond.
Example :
- To play the audio 3 second late set Audio time shift (ms) to 3000.
- To play the audio 4.5 second late set Audio time shift (ms) to 4500.
- To play the audio 5 second early set Audio time shift (ms) to -5000.
- To play the audio 6.125 second early set Audio time shift (ms) to -6125.
To use audio time shift ,
- Select Internal Filters > Audio Switcher tab.
- Check the check box labelled Audio time shift (ms).
- Enter the amount of time (in ms) for shifting of audio track in the text box.
To disable audio time shift ,
- Select Internal Filters > Audio Switcher tab.
- Uncheck the check box labelled Audio time shift (ms).
Enable custom channel mapping
Custom channel mapping feature can be used to setup custom mapping of output audio for a specific input audio
Enable custom channel mapping :
- Checked : The custom audio channel mapping will be used.
- Unchecked : The custom audio channel mapping will not be used.
Speaker configuration for : It is used to select the number of input audio channel for which channel mapping will be done.
The audio in a media file can have any number of audio channel 2, 6, 8.
Example 1
With the config shown above,
When the media file has two audio channels (stereo), the both of the input audio channel will be output to Front left channel.
Example 2
When the media file has two audio channels (stereo), the input audio channel no. 1 will output in Front Left and the input audio channel no. 2 will output in Back Right.
Example 3
Input audio config : 5.1
Number of Input audio channels : 6
Output config
Input audio channel 1 is mapped to output Front Left.
Input audio channel 2 is mapped to output Front Right.
Input audio channel 3 is mapped to output Front Left & Front Right.
Input audio channel 4 is mapped to output Front Left & Front Right.
Input audio channel 5 is mapped to output Front Left.
Input audio channel 6 is mapped to output Front Right.
Audio renderer Tab settings
Audio renderer tab setting will work when Internal Audio Renderer is selected as Playback > Output > Audio Renderer .
Device
Device drop down list can be used to select output audio device(adapter). it is useful when there are multiple audio device installed in the computer.
- Internal Filters > Audio Renderer tab.
- Select the Audio adapter device from the drop down list labelled Device.
- Select Apply button.
Exclusive Mode
- Checked : MPC-HC internal audio renderer will run in exclusive mode. Only audio from MPC-HC app will be output from the audio device. Windows OS system audio mixer will not be used. The output audio is more clear and has high audio level compared to Shared mode.
- Unchecked : MPC-HC internal audio renderer will run in shared mode.
Allow bitstreaming : When this option is checked,
Stereo crossfeed
If
you are using headphone then enable stereo crossfeed. As the name says
it cross feed the small percentage of Left and Right channel with each
other.
To Enable stereo crossfeed, do the following:
- Check Enable stereo crossfeed (for headphones).
- Select a preset ( C. Moy or J. Meier) button.
External Filters tab
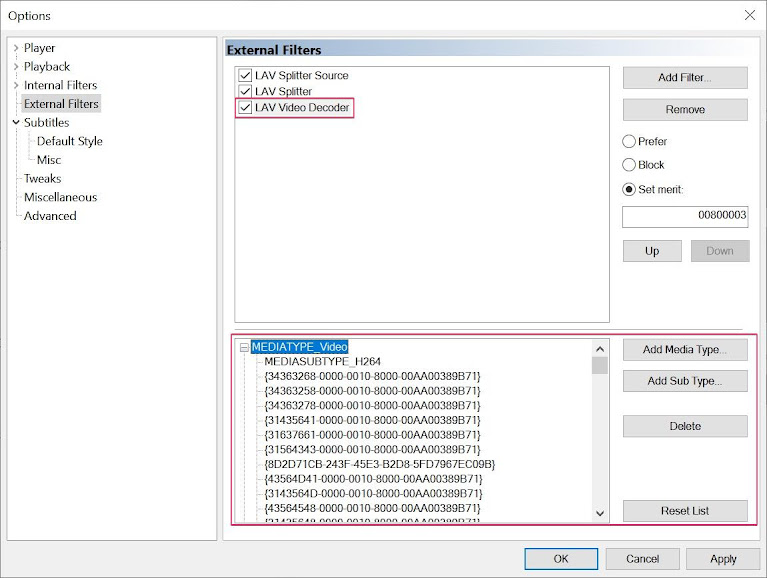
MPC-HC app maintains the list of External Filters which will be used in MPC-HC.
Add Filter
Add filter button can be used to add Directshow based external filters which will be used by MPC-HC app.
Selecting add filter button open a new window which shows the registered Filters in Windows OS. The window with title Select Filter will show the list of DirectShow Filters registered in the system. To add a Filter in MPC-HC, select a filter and select OK button.
Browse button can be used to add a Filter using File Explorer.
Set Filter preference
Prefer usage of a Filter in MPC-HC
A External Filter can be set to be preferred for usage
Prefer : When a Filter is selected and the Prefer radio button is selected, the selected Filter is set as preferred for usage in MPC-HC app over the internal Filters.
Block : When a Filter is selected and the Block radio button is selected, the selected Filter is blocked from usage in MPC-HC app.
Set Merit : When a Filter is selected and the Set Merit radio button is selected, user can set the merit for the selected Filter.
Add Media Type : This button is used to add the Media type to the selected Filter. Example of Major type is Video, Audio and stream.
Add Sub Type : This button is used to add the Media Sub Type to the selected Filter.
Delete : This button is used to delete the Media Type and Sub Type from the selected Filter.
Reset List : Reset list button is used to reset the media type setting of the selected Filter.


إرسال تعليق