These are some settings which can be done in Microsoft Windows 10 Operating System for improve the performance and stability of the computer.
System Config :
- Microsoft Windows 10 Pro x64 20H2
Computer Hardware
On the hardware side, fast hardware components is necessary for faster performance of the computer.
RAM : It is recommended to have minimum 8GB RAM installed in the computer. 16 GB RAM should be installed for optimum performance if multiple apps are used . A computer with low RAM will always suffer from slow performance.
Hard Disk/SSD : The partition in which Windows OS is installed must be of capacity which can store all the necessary Windows OS files and applications installed in the system.
The minimum partition size(capacity) should be 60 GB. A computer with low partition size in which Windows 10 OS will suffer from slow overall performance. It is recommend that user allocate 100 GB or more for the partition in Microsoft Windows OS is installed.
Disable Fast Start-Up
Fast Startup feature helps in faster start up of the Windows OS after the system is gone through Shutdown procedure.
With Fast Startup feature enabled Window OS files is saved using hibernate procedure when the user Shut Down the computer. The next time the computer starts, it starts faster because Windows OS files is loaded quickly from hibernation file.
Using Fast Start-Up feature can cause some stability issues. So its better to disable it.
To disable Fast Startup do the following:
- Open Control Panel > Power Options.

- Select Choose what the power buttons do.

- Select Change settings that are currently unavailable.

- Uncheck Turn on fast start-up.
- Select Save changes button.

Enable Storage Sense
Windows 10 Storage Sense can delete temporary files which is not required by the Window OS and the applications installed in the computer. This tool from Microsoft can be very useful in removing unnecessary old files from the computer which consumes storage space.
The type of files it can remove includes Temporary setup files,System cache files, Internet cache files ,Device Driver packages ,System downloaded program files, dated system log files, system error memory dump files, System error minidump files, Temporary system files.
To enable and setup Microsoft Storage Sense, do the followings:
- Select Start Menu > Settings to open Windows 10 Settings.
- Select System > Storage.
- Select Configure Storage Sense or run it now.

- Toggle ON the Storage Sense to enable it.
- Select Every months from the drop down list labelled Run Storage Sense.
- Check the check box labelled Delete temporary files that my apps aren't using.
- Select 60 days from the drop down list labelled Delete files in my recycle bin if they have been there for over.

Recycle Bin Settings
Unintentional deletion of files can be very troublesome if important files get deleted. Files stored in the local storage media can be easily deleted id the user accidentally press the Delete key in the keyboard or selects the delete button in Window OS. It becomes very difficult or impossible to recover that file.
Enabling the delete configuration dialog box is useful in preventing accidental deletion of files. It adds a layer of security against unintentional deletion of files from the computer.
Instructions
- Right click on Recycle Bin and select Properties.

- Check the check box labelled Display delete confirmation dialogue.
- Select Apply button.

Windows OS partition Free Space
Free space in the partition in which Window 10 OS is installed is required for optimal performance of the computer. If the partition is running with low free space, it can cause slow overall performance.
It is recommended that free space in the partition be at least 10 GB. For optimal performance the Free space should 20 GB or more.
Check Free space in Windows 10 Settings
To check the Free space size, do the followings:
- Select Start Menu > Settings to open Windows 10 Settings.
- Select System > Storage.
- Check the Free Space size.

Check Free space in the Partition(volume) Properties window
- Open File Explorer.
- Right click on the partition in which Windows OS is installed and select Properties.
- Select General tab.
- Check the Free space size.

Automatically detect proxy settings
To disable automatic detection of proxy, do the following:
- Select Settings > Network & Internet > Proxy.
- Turn Off Automatically detect settings.

Install .NET Framework 3.5
It is required to run the application which has been built using .NET Framework 3.5.
To Install .NET Framework 3.5, do the followings:
- Open Control Panel > Program and Features.
- Select Turn Windows features on or off.

- Check the checkbox labelled .NET Framework 3.5 .
- Select OK button.

Configure installed applications
Every applications installed in the computer must be configured properly.
Go through the setting of each application and do the setting it requires for proper operation.
Speaker Configuration
Correct speaker configuration in Windows OS sound setting is necessary for proper audio output.
To setup speaker configuration, do the following :
- Select Control Panel > Sound > Playback tab.
- Select the Default sound Device which will be used to output the audio.
- Select Configure button.

- Select proper Speaker Configuration connected to the computer from the list labelled Audio channels.
- Select Next Button.
- Complete the speaker configuration.

Update drivers for Hardware's
Using the latest driver for all the hardware which has been installed in the computer is necessary for faster and stable performance of the computer.
- User can manually find and install the latest driver.
- User can use Driver updater software to install latest driver. Driver booster application can be used to update the device drivers.
Adjust ClearType text
Enabling ClearType is helpful in improving the readability of text on the display monitor.
To Enable ClearType, do the following :
- Open Control Panel > Fonts.
![]()
- Select Adjust ClearType text button.
![]()
- Check Turn on ClearType.
- Select Next button.
- Follow the instructions.
Hardware Accelerated GPU scheduling
Enabling Hardware Accelerated GPU scheduling can be useful for application that uses GPU. If this setting is available then Enable it.
To Enable Hardware-accelerated GPU scheduling, do the followings :
- Select Settings > Display > Graphics Settings.
- Toggle On the Hardware-accelerated GPU scheduling.

Graphics performance preference
Add an desktop application which will
- Select Desktop app in the drop down list labelled Choose an app to set preference.
- Select Browse button.
- Select the application using File Explorer.
To Add an Microsoft store app, do the following:
- Select Microsoft Store app in the drop down list labelled Choose an app to set preference.
- Select an Store app from the drop down list.
- Select Add button.

Graphic preference options are :
- Let Windows decide : When this option is selected, the Windows OS will decide in which mode the app will run.
- Power saving : When this option is selected, the GPU runs the app in power saving mode.
- High Performance : When this option is selected, the GPU runs the app in High performance mode.
To set Graphics performance preference for an app, do the following :
- Select an app from the list.
- Select Options button.

- Select a graphics performance preference for the app.
- Select save button.

Windows Update for other Microsoft products
Turn On updates for other Microsoft products installed in the computer.
To do so, do the following :
- Select Settings > Update & Security > Windows Update > Advanced options.

- Toggle On the setting labeled Receive updates for other Microsoft products when you update Windows.

Update Microsoft Store App
- Open Microsoft Store app.
- Open the menu from top right corner as shown in the image below.
- Select Downloads and updates.

- Select Get Updates button.


Uninstall Unnecessary applications
Uninstall desktop and Microsoft store applications which will not be used.
- Open Start Menu > Settings > Apps & Features.
- Select an app which you want to uninstall and select Uninstall.
- Follow the instructions.

Install only Stable apps
To ensure the stability of the system it is necessary that user install only those software's which are well built, stable and trustworthy.
Software's which install drivers can cause stability and performance issue if the driver installed by the software is not stable or if the driver is not compatible with other drivers installed in the system.
Use System cleaners and Tweaking software
Using system cleaner software which can clean Windows Registry and junk files in the computer is useful in speeding up the computer. Use system optimization software to optimize Windows OS Settings for better performance.
Use simple apps like CCleaner and Wise Care 365.
Read the documentation carefully before using the software.
Cleaning the Windows registry and junk files once in a months is good practice.
Windows Update Preview
Never Install Optional quality updates. These Update Previews are unstable and can cause a lot of stability and performance issue.

File Explorer Folder Option Settings
- Check the check box labelled Launch folder windows in a separate process.
- Check the check box labelled Use check boxes to select items.
- Select Apply button.

Enable Administrator account
User can enable Administrator account. In case the user profile gets corrupted, user can log in using Administrative account.
To enable Administrative account do the following :
- Open Start Menu > Windows Administrative Tools > Computer Management.
- Select System Tools > Local Users and Groups > Users.
- Right Click Administrator and select Properties.

- Uncheck the check box labelled Account is disabled.
- Select Apply button.

Password protect Administrator account
From security it is required to password protect the Administrator account.
If user want to protect the Administrator account, do the following :
- Open Control Panel > User Accounts.
- Select Manage another account.

- Select Administrator.

- Select Create a password.
- Follow the instructions.

Regular checkups for stability
Running Regular checkups in Windows 10 is very useful in maintaining the stability of the computer.
System File Checker tool
System File Checker (SFC) utility can check and fix the Microsoft Windows 10 OS system files. If it finds a
It is recommended to run this tool once a months to make sure that system files are in good condition.
User must run the SFC tool if the computer shutdown abruptly due to various reasons.
1. Run Windows PowerShell as Administrator
User must run Powershell tool in Administrator mode
To run Powershell in administrator mode, do the following:
- Open Windows 10 Start Menu.
- Search Windows PowerShell and right click on it.
- Select More > Run as administrator.

2. Repair the Window image file
Deployment Imaging and Servicing Management (DISM) tool can be used to scan the Windows OS image for component store and repair the corrupt files. It uses Windows Update feature to repair the Windows image file and requires a live internet connection for the repairs.
- Type and run the command DISM.exe /Online /Cleanup-image /Restorehealth in the Windows PowerShell.

- Let the DISM tool check and and repair the image file.


3. Run SFC tool
System File Checker tool will scan the Windows 10 system files and if any file is found missing or corrupt then it will repair that file.
To run the SFC tool type and run the command :
- sfc /scannow

- If any corrupt files are found then it will automatically repair it.

Run Check Disk tool
Check Disk Utility software can fix logical errors in a storage drive (volume). This utility works on FAT32 and NTFS file system.It is recommended that the user run the Check Disk tool on every Drive(volume) once a month.
User must run the SFC tool if the computer shutdown abruptly due to various reasons.
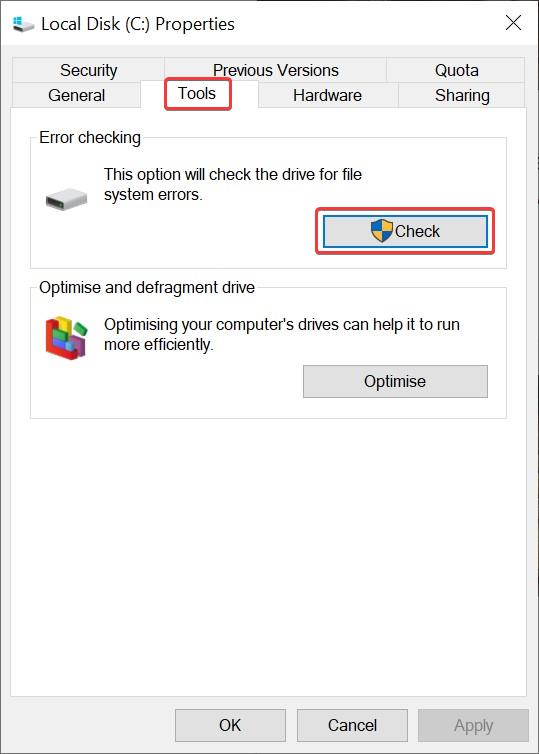
To run Check Disk on a drive, do the following :
- Exit all the application which are running.
- Open File Explorer.
- Right click on a Drive and select Properties.

- Select Tool tab.
- Select Check button in the group box labelled Error checking.
- Select Scan Drive.
- Follow the instruction.

- If there is no logical error in the drive file system then Chkdsk will show the message as shown in the image below.
